See how placenta encapsulation is done in step-by-step photos and video, from the raw placenta to neat little pills that can be taken as supplements.
Last week we talked about why you would want to consume your placenta. Now, in an effort to demystify the process of placenta encapsulation, my doula Deb and I wanted to show you the step-by-step process.
Please keep in mind that it’s important to work with a trained specialist to encapsulate your placenta. Agencies like Placenta Benefits or Full Circle Placenta offer certifications. Many doulas are trained in placentophagy and encapsulation.
Placenta encapsulation costs around $200 on average. Be sure to ask for a tincture as well (a concentrated alcohol-based placenta infusion), as this can be a great supplement as you head into menopause (the shelf life is long so don’t worry about it going bad).
Without further ado, let’s show you the process…
Placenta Encapsulation From Start to Finish Video
See Deb in action in this video as she does the placenta encapsulation process from start to finish.
Or….
No patience for a video?
Scroll down below to see step by step photos of the placenta encapsulation process.
How My Doula Deb Made My Placenta Capsules
Placenta Encapsulation Graphic 1
First Deb sanitized the workspace.
Placenta Encapsulation Graphic 2
Next she rinsed the placenta in the sink and drained all the blood out.
Placenta Encapsulation Graphic 3
Then she placed it in a steaming basket…
Placenta Encapsulation Graphic 4
…and steamed the placenta lightly.
Placenta Encapsulation Graphic 5
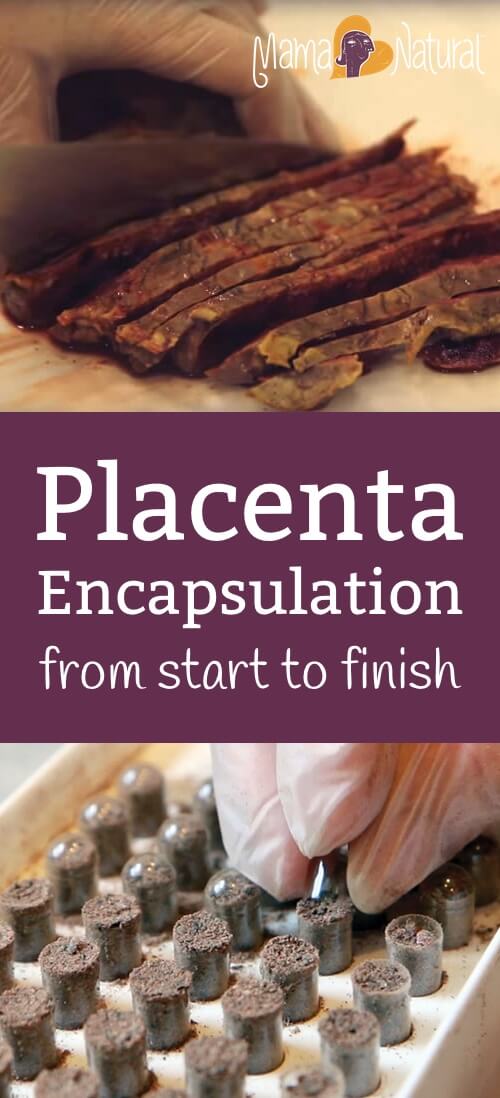
When the placenta finished steaming she sliced it into strips.
Placenta Encapsulation Graphic 6
Then she put the strips into a dehydrator.
Placenta Encapsulation Graphic 7
We dried the placenta strips overnight and then some – about 18 hours in total.
Placenta Encapsulation Graphic 9
Deb came back to our house the next day and took the dried strips out of the dehydrator and placed them into a grinder.
Placenta Encapsulation Graphic 9.1
It was kind of like a coffee grinder.
Placenta Encapsulation Graphic 9.3
She ground the dried placenta strips until they became a fine powder.
Placenta Encapsulation Graphic 8.1
Next she got her handy little capsule loader ready by putting the large part of the capsules in place.
The tops were set aside for closing the capsule once it was filled.
Placenta Encapsulation Graphic 10
She poured the placenta powder out over the capsule loader.
Placenta Encapsulation Graphic 10.1
She spread the placenta powder evenly across the top of the placenta capsule loader.
Placenta Encapsulation Graphic 11
The she lowered the contraption and… voilà.
Placenta Encapsulation Graphic 11.2
Time to cover the placenta capsules with the tops.
Placenta Encapsulation Graphic 11.3
Look at all that placenta-y goodness.
Placenta Encapsulation Graphic 12
Finally, Deb wiped the placenta pills off with paper towel before storing them an opaque jar.
Placenta Encapsulation Graphic 13
Looks good enough to eat, don’t they? Relatively speaking.
My placenta yielded 107 placenta pills plus a placenta tincture, which is some of the powder steeped in an alcohol for long term preservation.
Catch up with my Chicago-based doula Deb Lawrence on her website or Doula Match.
Learn more about birth doulas, the angels of the childbirth process.
Learn to have an amazing birth – Birth Course Promo [In-article]
(without leaving your couch)
See How
So, My Placenta Pills Were All Ready to Eat
And, like a good natural mama, I got right down to it. But my results were a little unexpected.
Click here to read about my experience eating my placenta
How About You?
Did you eat your placenta? How did you do so? Did you notice any results? Share with us in the comments below.